
One of the key benefits of hosting applications in the AWS cloud is the pay-as-you-go pricing model. This means that you only pay for the resources you use, and there are no additional costs when you stop using them. Customers who run their workloads on Amazon EC2 instances (a virtual server) can save money by stopping instances during off-business hours. However, this does not apply to EC2 instances that are running on Dedicated host, as you are still billed for the underlying host. This blog post will explore cost optimisation methods by automating the lifecycle of Dedicated Hosts.
Target Audience
For AWS customers who want to use Dedicated Hosts for a short time periodically, this solution automates the process of provisioning and deprovisioning the hosts.
Why and when to use Amazon EC2 Dedicated Hosts?
Amazon EC2 Dedicated Hosts are physical servers that are reserved for your exclusive use. You can choose from a variety of configuration, including physical core, sockets, and vCPUs. This allows you to run EC2 instances of different sizes, depending on your business needs.
You can use software licenses that are bound to VMs, sockets, or physical cores, such as Windows Server, SQL Server, SUSE Linux Enterprise Server, and red Hat Enterprise Linux. This allows you to leverage your existing investments and run applications on a single-tenant infrastructure to meet your compliance and regulatory requirements.
Customers often wish to run their dedicated host workloads for limited time such as during business hours, or on specific days of the month. In such cases, opting for Savings Plan or Reserved instances may not be cost effective.
Challenge
Amazon Dedicated Hosts need to be released when not in use to save cost, however releasing a dedicated host is different from stopping an EC2 instance. You need to either terminate or stop all EC2 instances before you can release the Dedicated Host. This process can get complex and error-prone, especially when you are managing a large number of hosts and instances. Hence automating the runtime of EC2 instances and underlying dedicated host can help eliminate manual efforts and make the process more reliable.
Solution Overview
This section describes the approach and AWS services involved in the solution.
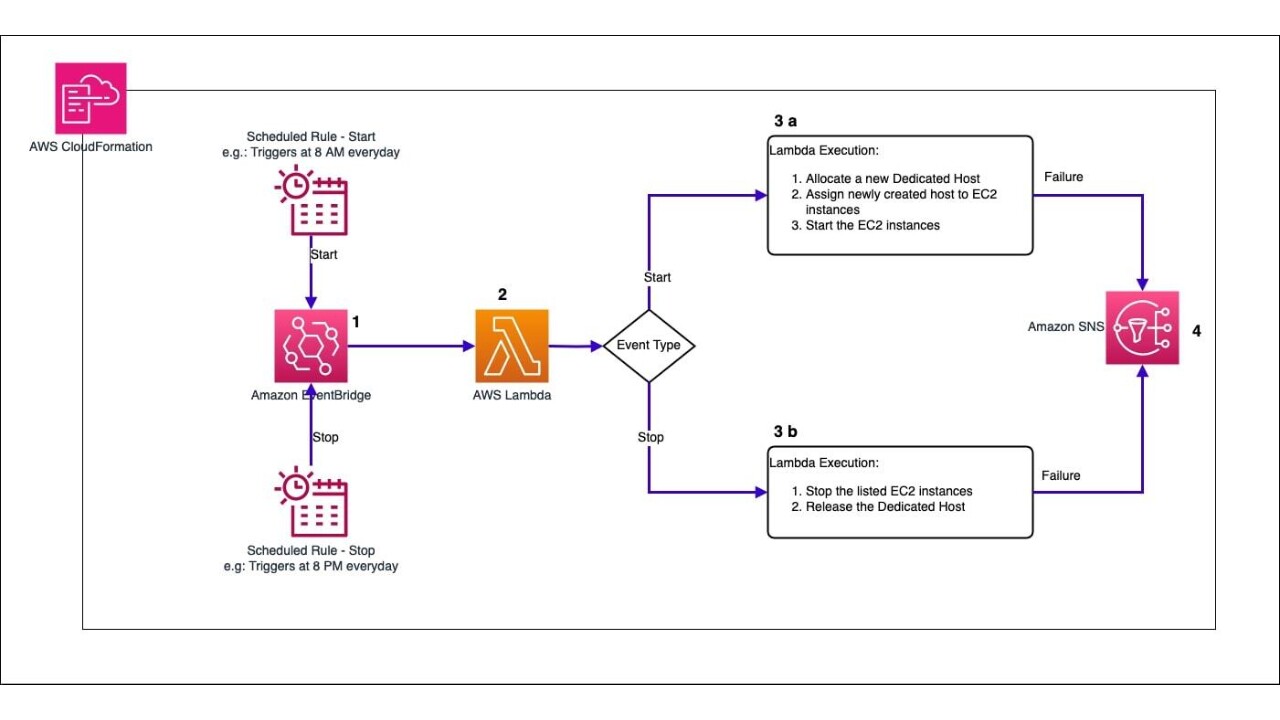 Figure 1: Automation Architecture
- This solution deploys two Amazon EventBridge rules, which are triggered as per the schedule (cron) provided in the CloudFormation stack parameter.
- AWS Lambda then reads the event and executes a workflow based on the trigger event.
- Based on the trigger event one of the below workflows will be executed.
- If the trigger event corresponds to start, then automation Lambda will allocate a new dedicated host and will start all the ec2 instances in that host.
- If the trigger event corresponds to stop, then automation Lambda will first retrieve all the instances running in the host, then try to stop all instances successfully, once done it will release the host.
- If execution fails for any reason, then AWS Lambda function will catch the exception and send an alert to the subscribed email address in the SNS topic.
Considerations
Before you launch the solution, please review the architecture, configurations, and other considerations discussed below.
- This solution works at a single dedicated host level.
- All instances in a given host will have same stop/start schedule.
- Verify whether the value provided for Instancetype parameter is supported in the deployment region.
- EC2 Mac Dedicated Hosts have a minimum host allocation and billing duration of 24 hours.
Deployment
Follow the step-by-step instructions below to deploy this solution into your account.
Time to deploy: Approximately three to five (3-5) minutes
- Log in to your AWS account and navigate to AWS CloudFormation console, click on Create Stack, with new resources
- In specify template section
- Click on Upload a template file option
- Click on Choose File option and upload the template
- Select Next
- Provide a stack name to the deployment
- Under Parameters, review the parameters for the template and modify them as necessary.
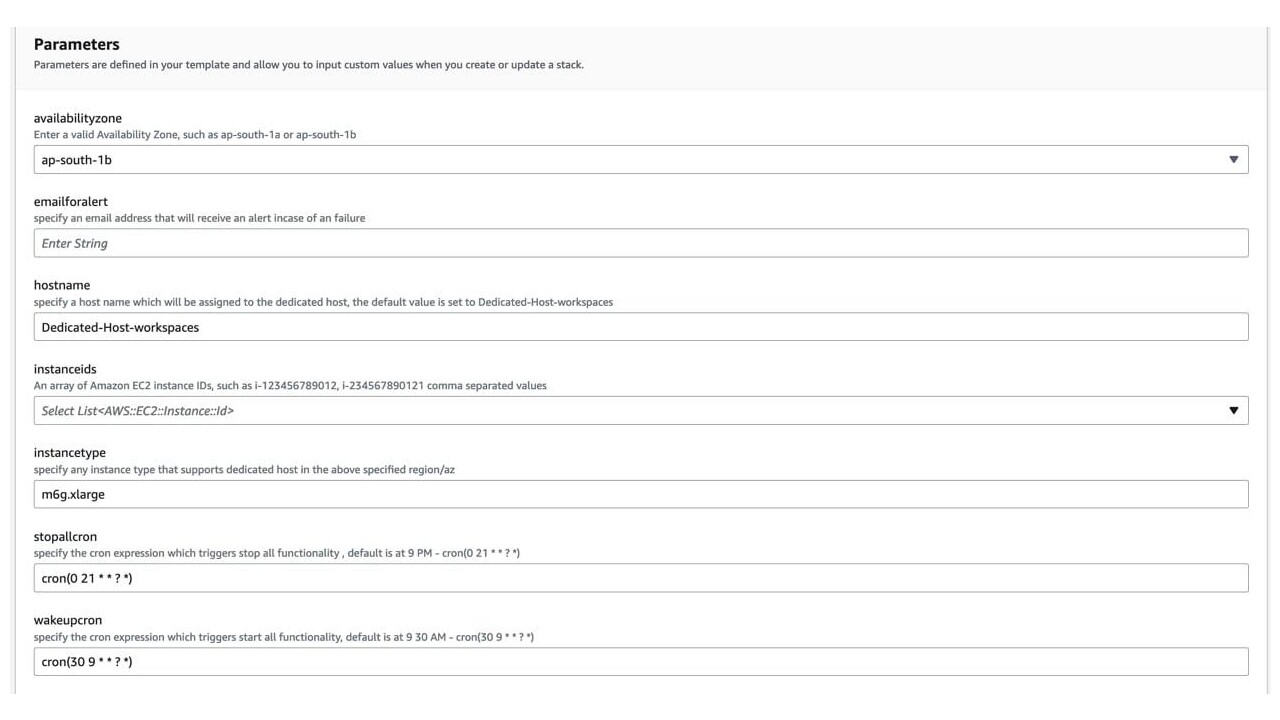 Figure 2: CloudFormation Stack Parameters
Below parameters are required while creating the CloudFormation stack:
- availability zone: Availability zone where Dedicated Host and EC2 is currently running (or stopped)
- email for alert : Sends alerts via SNS to the specified email address. Make sure you subscribe to the confirmation mail once the stack creation is successful.
- host name: User friendly name for the Dedicated host
- instance ids: from the drop down select the list of instance ids of EC2 instances that will run on the host. Note, all these instances will have same start and stop schedule.
- instance type: Dedicated host instance type
- cron schedules: Schedule to trigger start and stop of the Dedicated Host
- Choose Next
- On Review page, review the changes and acknowledge at the bottom
- View change set and verify changes.
- Choose Update Stack to deploy the changes
Updating the stack
Follow below steps if you would like to update the configurations or modify the scheduler timing
- Log in to your AWS account and navigate to AWS CloudFormation console, select the stack in which you have deployed the solution
- Select Use Current Template
- Under Parameters, review the parameters for the template and modify them as necessary.
- Choose Next
- On Review page, review the changes and acknowledge at the bottom
- View change set and verify changes.
- Choose Update Stack to deploy the changes
Disabling the schedule
Follow below steps if you would like to stop the schedule temporarily
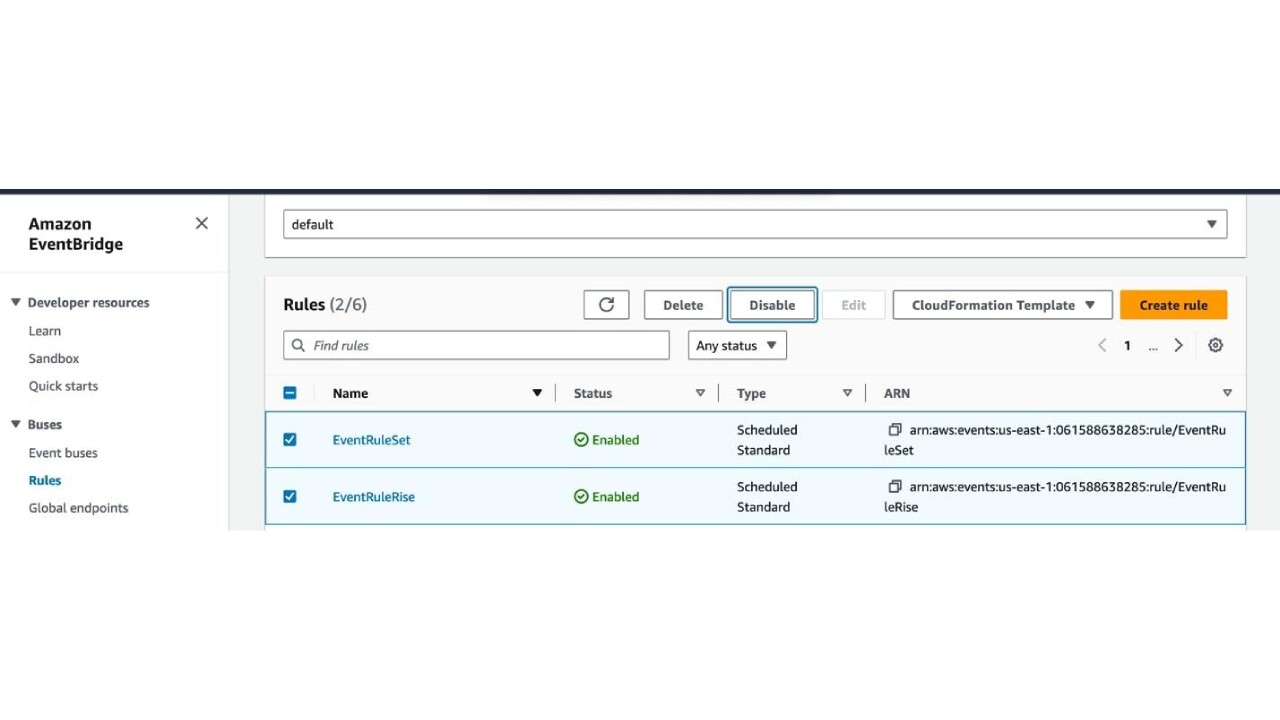 Figure 3: Disabling the Amazon EventBridge Rule
- Log into your AWS account and navigate to Amazon EventBridge console, click on Rules under Buses section of the left pane.
- Select the rules EventRuleSet, EventRuleRise and click on Disable button as shown in above figure 3, and confirm the changes.
Note: All the resources created as part of this solution will remain. Disabling Amazon EventBridge rules will only stop triggers to AWS Lambda.
Benefits
Below are the benefits of using this solution
- Automation: The solution automates the Lifecycle Management of Dedicated Hosts and EC2 instances running on these hosts thereby reducing manual efforts and errors.
- Flexibility: The solution allows you to define your own schedules to trigger the allocation and release of dedicated hosts.
- Cost savings: By automating the process of allocation and release of Dedicated hosts, you can optimize your AWS costs by only paying for resources when they are needed.
Cleanup
To entirely delete the CloudFormation stack, you can go to the AWS CloudFormation console and select on the solution stack and click on Delete.
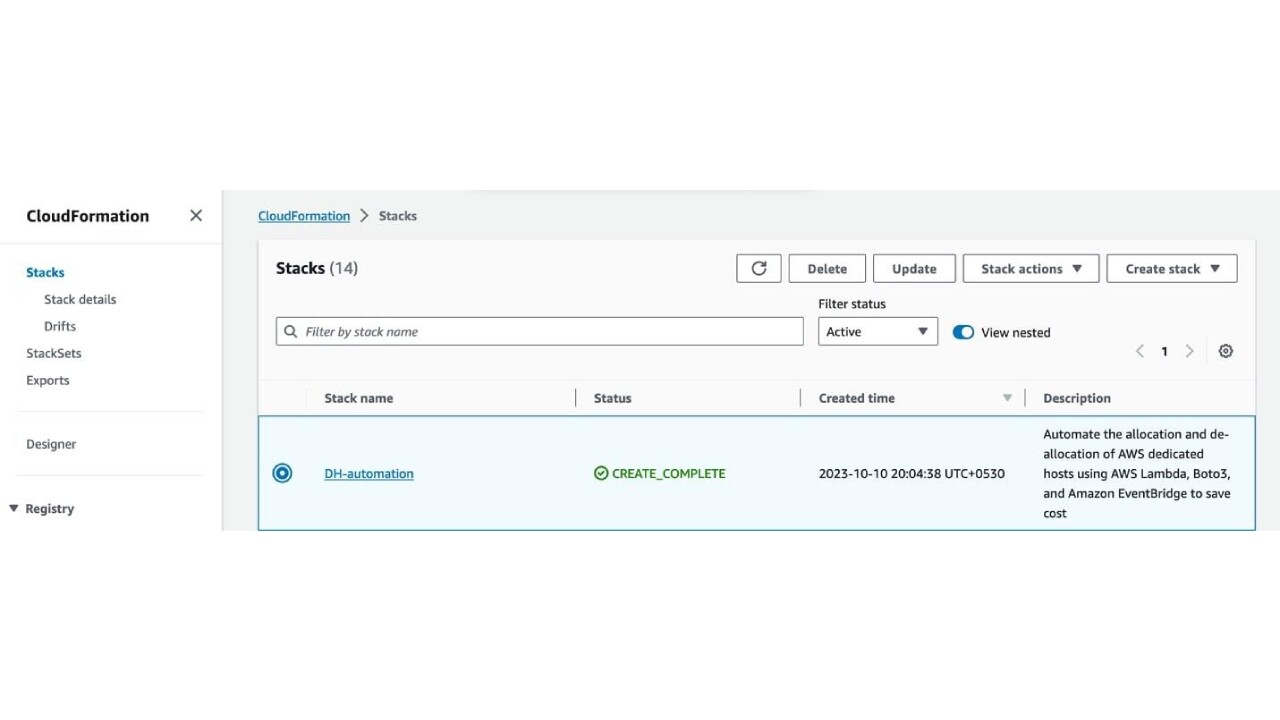 Figure 4: Deleting Stack
- Log in to your AWS account and navigate to AWS CloudFormation console, select the stack in which you have deployed the solution
- Click on Delete button, confirm the deletion.
Note: this only deletes the resources created by the AWS CloudFormation template, any ec2 instance which was scheduled via this solution will remain in the same state (running or stopped) as prior to the deletion.
Conclusion
This solution demonstrates how to automate the allocation and de-allocation of AWS dedicated hosts using AWS Lambda, AWS SDK for Python (Boto3), Amazon SNS and Amazon EventBridge. By leveraging this solution, you can reduce manual effort, optimize your AWS costs, and improve the efficiency of your infrastructure management.