Given the pace of technology today, while building an app, preparing it to be agile, scalable and resilient is critical. The tech stack needs to be efficient, solve the current problem and code needs to be easy to read and maintain, as the team changes. To get the first designs right, and equip the app to deal with these challenges, the question is - which architectural design pattern to adopt? And in 80% of all native Android apps, the correct answer to this question is MVVM(I) (Model-View-ViewModel).
Defining MVVM(I)
Coding is easy; one just needs to speak the language of the compiler or interpreter and voila! Software development on the other hand is difficult. The code/ tech stack needs to be efficient and solve the current problem. It also needs to be well-encapsulated and follow the open-closed principle, so as to cater to future needs. The code needs to be easy to read and maintain. If not, as people leave and new people join the team, the codebase becomes a liability. The stack also needs to be scalable and, resilient.
How successful the tech stack is in dealing with these challenges, is determined in those first tech stack designs. Thus, as developers, it is our responsibility to perform an extensive deep-dive and insist on the highest of standards on behalf of our customers. And get these first designs right! To get the first designs right, we have to answer many important questions. Arguably the most important question of all is "which architectural design pattern do we adopt?"
In this blog, I am making a claim that in 80% of all native Android apps, the correct answer to this question is MVVM(I) (Model-View-ViewModel). I will explain, refine and strongly define the design. I will then proceed to test this design against a fairly complicated and evolving real-world use-case, and see how it stands up.
Consequently, this blog will be long and exceedingly technical in nature. We will choose to gain knowledge of the fundamentals over cognitive ease at every turn. If you are willing to put in the time and effort, then after reading this blog, you should be able to jump directly into most Android architectural designs, and make a meaningful impact. If this return on investment of your time seems reasonable to you, let’s proceed.
Unlike a use-case-specific pattern (ex. factory pattern [0]), which caters to a subset of use-cases, an architectural design pattern (ex. MVC [1]) determines how the entire tech stack behaves. It is omnipresent and has a stickiness to it. Basically, once you commit to it, you are stuck with it, good, bad, or ugly. Yes, these patterns are opinionated, but that is by design. Good patterns enforce clean code [2] [3]. They add a much-needed structure to the code base and make it easier to navigate. The abstractions provided by the patterns allow for clean feature addition and easy debugging.
What we must be cautious of is the stickiness. Once you commit to an architectural design pattern, there is no easy way of retreating. For that reason, we need to thoroughly think through which pattern works best for us today, and will continue to work best for us at least 3 to 5 years down the line.
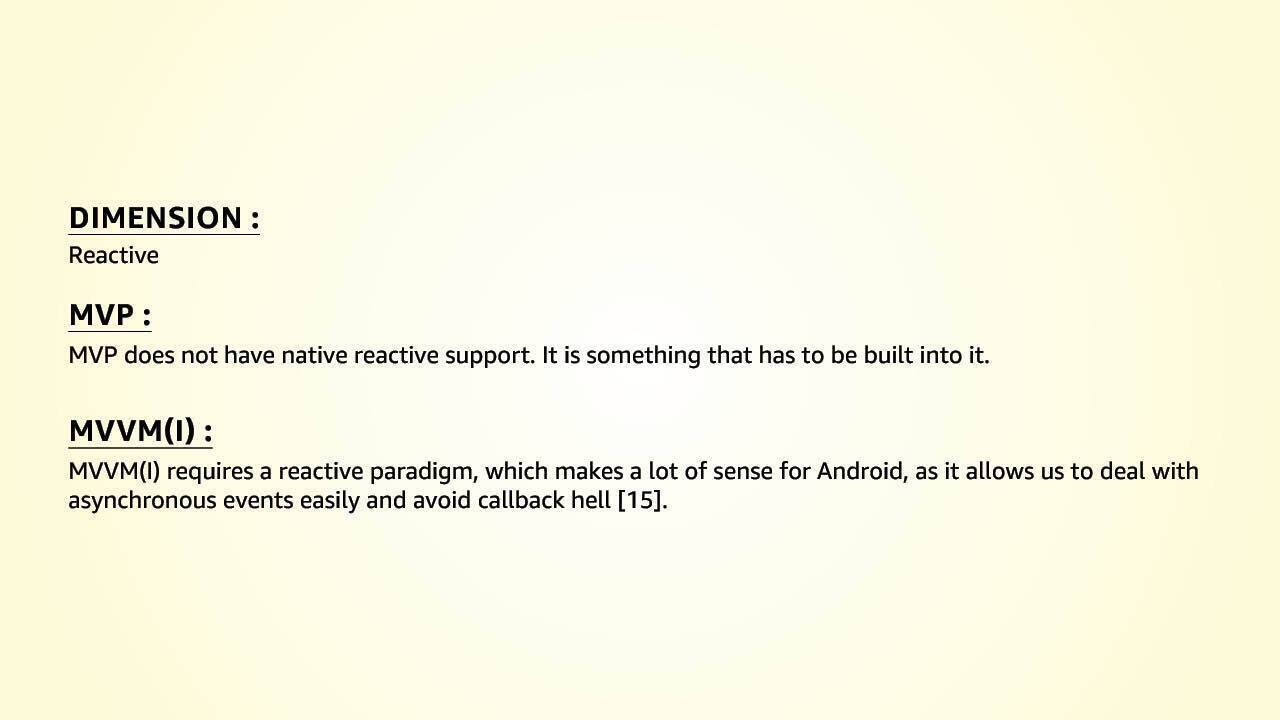
For Android, the choice of architectural design patterns is as expansive as it is varied. However, the general top 3 candidates are MVP, MVVM(I), and VIPER. Now, there are plenty of existing blogs that talk about these design patterns. Search “MVP vs MVVM(I)”, and you will be spoilt for choice[4][5]. There are blogs where others have shared their unique thought processes [6]. So instead of adding to that already sufficient body of work, let us clearly define our pattern of choice - MVVM(I).
MVVM(I) is a broad design pattern that is vastly open to interpretation. I appreciate the flexibility it offers, but its vagueness leaves much wanting:
- Should ViewModels be shared between the Fragment[7] and Activity[8]?
- What responsibilities are to be held by the Activity and Fragment respectively?
- What lifecycle scope should the components have?
- How much business responsibility should ViewModel encapsulate?
- When to use Interactor?
Now with definitions come opinions, but in this case, that is a good thing. Moreover, given the above sample set, you can appreciate how generic these questions are in nature. Here, well-defined answers can be applied irrespective of the use-case.
Using Java terminology, we will turn MVVM(I) from an open interface to a partially-defined abstract class. The only functions we plan not to define are the ones used to address the business-specific logic. In the following sections, we will put together a clearly-defined framework that can be a plug-n-play into your next Android app design.
Before we get started on the core concepts, let us ground ourselves with real world use-cases. At various points, we will harken back to them to evolve and test our design and ensure that the theory does not stray from practice. The case study we will be using is the SellerFlex app. This is an app that helps sellers sell their wares on Amazon. For the purpose of this blog, we will focus on one specific feature of this app - Inbounding.
Let’s understand the terminologies and the use cases in more detail.
01 / 04
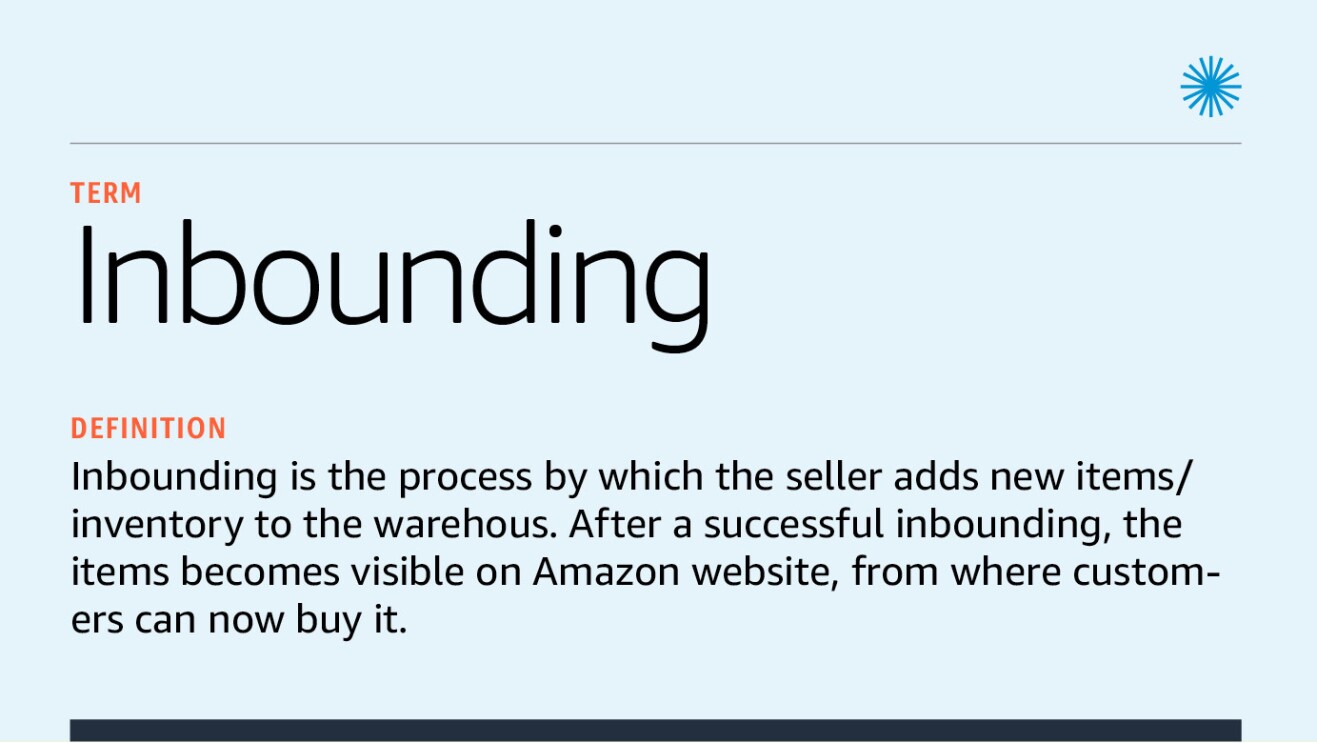
3.1 Inbounding Use-Case
The Inbounding process broadly consists of the following steps:
The Inbounding process broadly consists of the following steps:
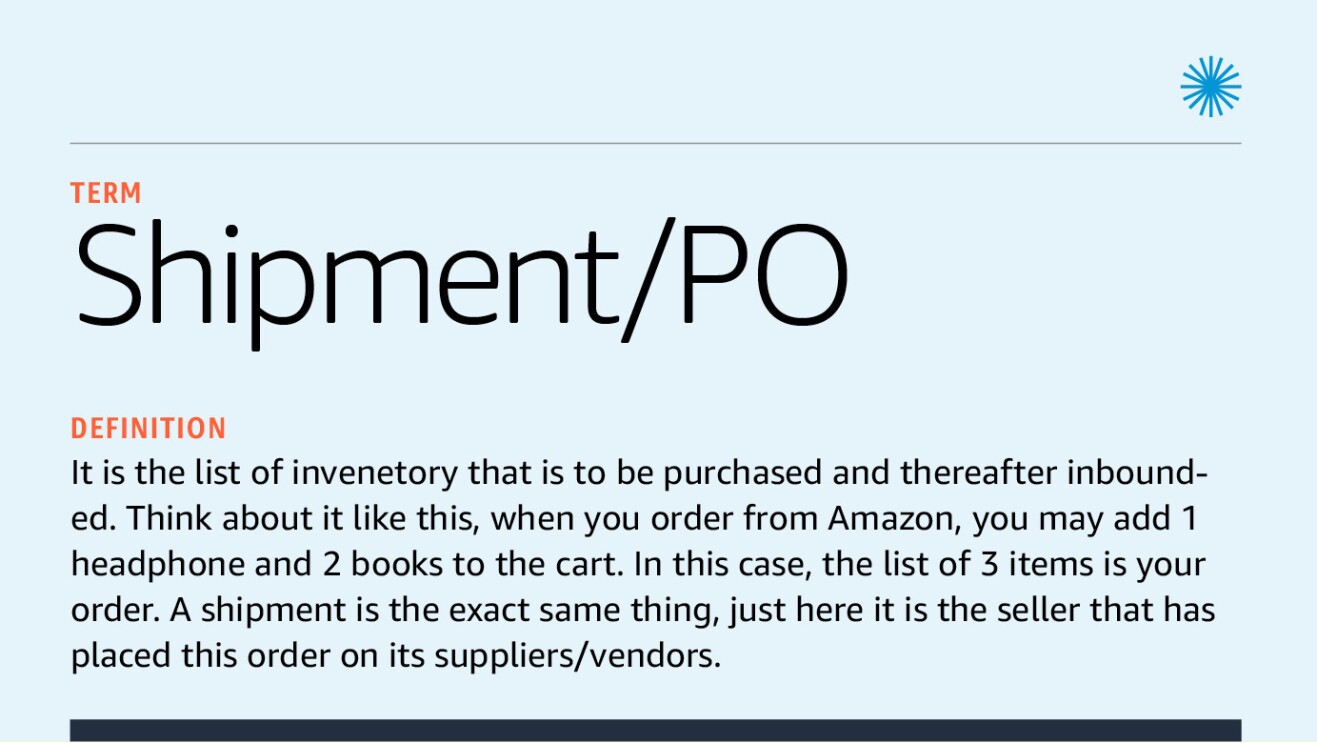
- Seller scans a shipment
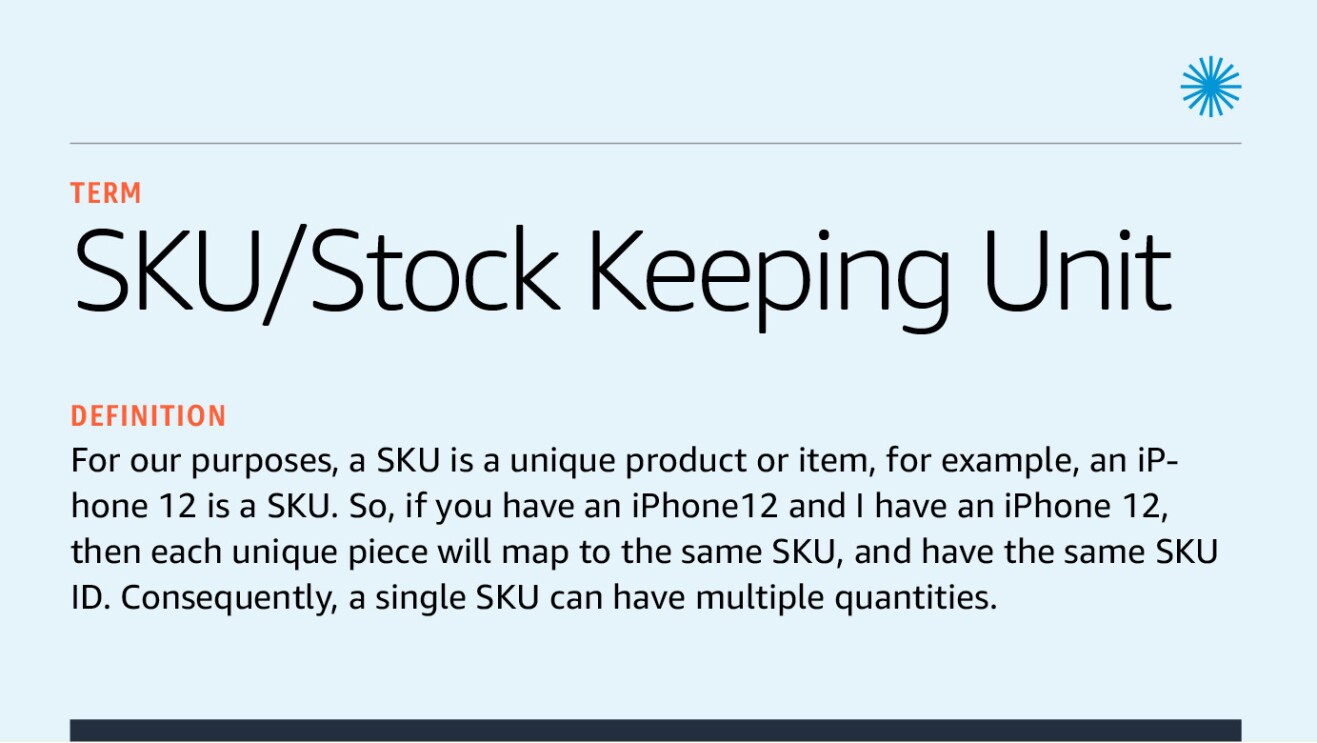
- Now for each SKU,
- Seller scans the SKU ID
- Enters the quantity to be Inbounded
- Scans the bin
Note: There are many more nuanced steps involved in an actual SellerFlex Inbounding, but for the purpose of this exercise, this should suffice.
3.2 Going offline when inbounding use-case
Not all areas of a warehouse may have Internet connectivity, yet it is precisely these areas where most of the bins might be kept. Thus, even without Internet connectivity, we will need to support Inbounding operations.
Now with this use-case in mind to set the context, onwards to the design!
Not all areas of a warehouse may have Internet connectivity, yet it is precisely these areas where most of the bins might be kept. Thus, even without Internet connectivity, we will need to support Inbounding operations.
Now with this use-case in mind to set the context, onwards to the design!
To cater to these requirements, we built a multi-module native Android app, with a focus on separation of concerns and plug-n-play reusability. It has a dedicated Backend-for-Frontend [9], WebView Support, and is written in a mix of Java and Kotlin.
In architecture terms, the app follows a unique variant of MVVM(I) design pattern, with a Multi-Activity-Multi-Fragment paradigm, reactive async call handling, and a lifecycle scoped Inversion-of-Control. Now let’s deep-deep dive into these!
4.1 Model

4.1.1 Responsibility
It is our data connector layer. For now, let us just say the model’s job is to get and save the data.
4.1.2 Composition
The model consists of the following :
4.2.1 Repository
Repositories are adapters. They mediate between the data sources, such as persistent models, web services, and
caches. They are also our hardware communicators. Say, we want to fetch scanned Shipment ID. This can be scanned
via camera, Zebra scanner, Bluetooth scanner, etc. The Repository will abstract this complexity away.
Thus, for any network, local and hardware data ingestion point, the Repository can be invoked.
4.2.2 Data sources
These are the various data sources. Each data source will be a unique implementation, for example:
- The network data source - Interfaces with REST calls. (Or, similar alternatives.)
- The local data source - Interfaces with SQL DBs. (Or, similar alternatives.)
These are the various data sources. Each data source will be a unique implementation, for example:
- The network data source - Interfaces with REST calls. (Or, similar alternatives.)
- The local data source - Interfaces with SQL DBs. (Or, similar alternatives.)
4.1.3 Scope
Model scoping is a contentious topic. Let’s evaluate the options.
Model scoping is a contentious topic. Let’s evaluate the options.
4.1.3.1 Application Scope
In this case, as long as the app is alive, the model will be too; thus as soon as the user opens the app, our model
will be instantiated, and remain in the memory until it is closed.
Pros
- Lowest latency
- Cleanest to implement
In this case, as long as the app is alive, the model will be too; thus as soon as the user opens the app, our model
will be instantiated, and remain in the memory until it is closed.
Pros
- Lowest latency
- Cleanest to implement
Cons
- Models that are unusable from the current UI will still be alive
- Will always consume RAM whether it is being used or not (Highest RAM consumption)
- Models that are unusable from the current UI will still be alive
- Will always consume RAM whether it is being used or not (Highest RAM consumption)
4.1.3.2 Activity Scope
In this case, as long as the Activity is alive, the model will be too.
Pros
- Average latency
- Average RAM consumption
- Models that are unusable from the current Activity (or page in web terms) will be garbage collected
In this case, as long as the Activity is alive, the model will be too.
Pros
- Average latency
- Average RAM consumption
- Models that are unusable from the current Activity (or page in web terms) will be garbage collected
Cons
- Repositories and Activities have similar lifecycles, but they do not have any direct relation to each other.
- The lifecycle similarity therefore is but a happy coincidence, and we have no other theoretical basis for this
type of scoping.
- Repositories and Activities have similar lifecycles, but they do not have any direct relation to each other.
- The lifecycle similarity therefore is but a happy coincidence, and we have no other theoretical basis for this
type of scoping.
4.1.3.3 Fragment Scope
In this case, as long as the Fragment is alive, the model will be too.
In this case, as long as the Fragment is alive, the model will be too.
- Pros
- Lowest RAM consumption
- Scoping dependency is strong. Models that are unusable from the current active Fragments (or widgets in web terms) will be garbage collected
- Cons
- Highest latency
- In case two Fragments call the same Repository, we will have two instances of the Repository running
4.1.3.4 Winner: Application Scope
Thus, there are arguments on all sides. If you are building a very complicated app, with a large number of Repositories and are targeting really low-end devices where the high RAM consumption becomes a bottle neck, then the Activity/Fragment scope becomes a better option [10].
Thus, there are arguments on all sides. If you are building a very complicated app, with a large number of Repositories and are targeting really low-end devices where the high RAM consumption becomes a bottle neck, then the Activity/Fragment scope becomes a better option [10].
If that is not the case, then application scope should be the scope of choice. For warehouse operations in particular, and any user flow in general the low latency is particularly attractive. This is because in general, lower latency translates to better UX. Moreover, it’s simple to implement and maintain. It is a Jack of all trades and master of some, and so is our recommended scope for the model.
4.2 View
4.2.1 Responsibility
Serves the view that the user can interact with and inform the ViewModel about the user’s actions. It is responsible for presentation logic.
Serves the view that the user can interact with and inform the ViewModel about the user’s actions. It is responsible for presentation logic.
4.2.2 Composition
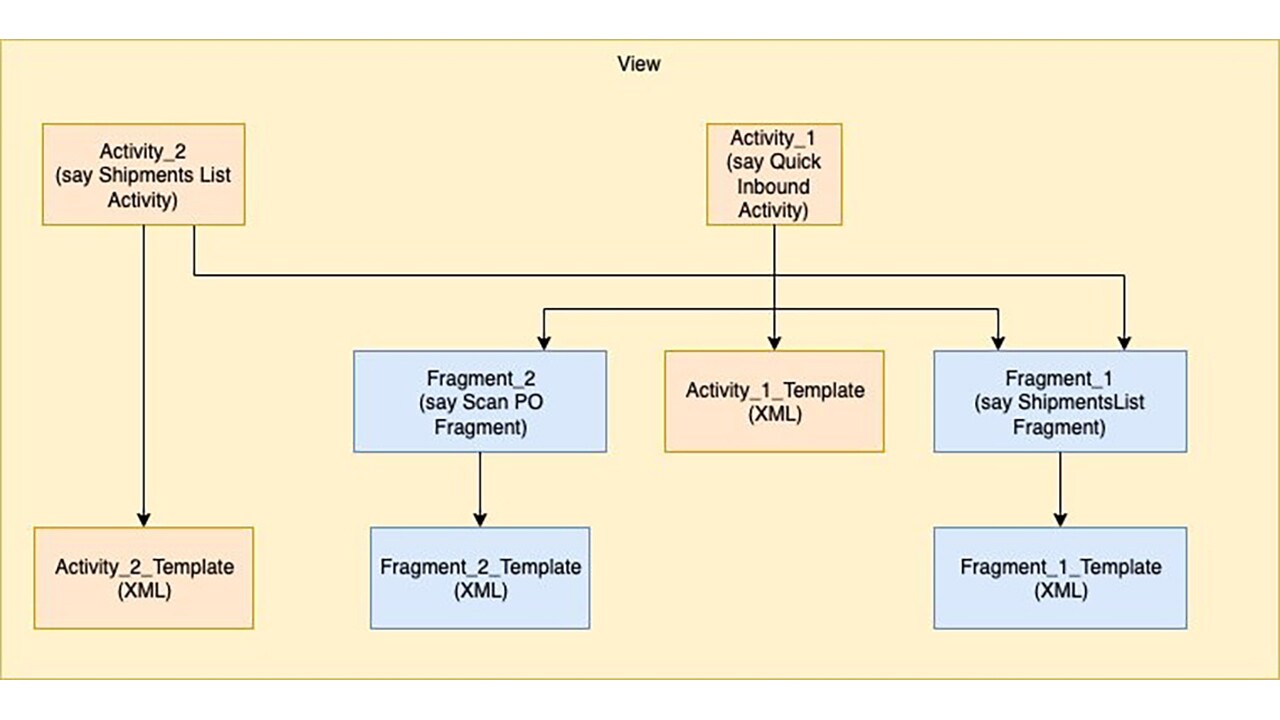
The View Layer is composed of 3 things:
The View Layer is composed of 3 things:
4.2.2.1 Activity
An Activity is one screen of the Android app's user interface. In that way, an Activity is very similar to a window in a
desktop application. The Android app starts by showing the main Activity, and from there, the user may navigate to
other Activities.
An Activity is one screen of the Android app's user interface. In that way, an Activity is very similar to a window in a
desktop application. The Android app starts by showing the main Activity, and from there, the user may navigate to
other Activities.
4.2.2.2 Fragment
A Fragment represents a behavior or a modular widget of the Activity. We can combine multiple Fragments in a single
Activity to build a multi-pane UI and reuse a Fragment in multiple activities. A fragment has its own lifecycle, receives its
own input events, but is always part of an Activity.
A Fragment represents a behavior or a modular widget of the Activity. We can combine multiple Fragments in a single
Activity to build a multi-pane UI and reuse a Fragment in multiple activities. A fragment has its own lifecycle, receives its
own input events, but is always part of an Activity.
4.2.2.3 View Templates
These are the layout resource [11] that forms the UI. When an Activity/Fragment is created, this resource will be
inflated, creating the view.
These are the layout resource [11] that forms the UI. When an Activity/Fragment is created, this resource will be
inflated, creating the view.
- Activity View Template – This will be a simple one, and its responsibility will be limited to
- Housing global (in the context of the screen) components, such as App Bar
- Housing Activity specific components such as the Inbound button in Inbound Activity
- Housing the Fragments
- Fragment View Template - These will be the complex view templates, that will render our UI elements, say ShipmentsListView
4.2.3 Relationship
- Activity to Fragment: This is an n:n relationship. One Activity can be composed of multiple Fragments, and one Fragment can belong to multiple activities.
- Activity/Fragment to View Templates: This is a 1:1 relationship. One Activity/Fragment is tied to one View Template.
4.3 ViewModel
4.3.1 Responsibility
The best way to think of the ViewModel is as a stateful business logic layer. Let’s take the two terms and explore them in the context of our use-case.
The best way to think of the ViewModel is as a stateful business logic layer. Let’s take the two terms and explore them in the context of our use-case.
- Business logic layer - In the course of Inbounding, once a seller has scanned the Shipment, someone needs to know what to do next. They need to know that the scanned ID is a Shipment, and as such the ID needs to be validated. The ViewModel is that someone. Now depending on the implementation, the actual job of performing the validation may reside here or may be delegated to someone else, maybe even to a different service, but the ViewModel will be the orchestrator.
- Stateful - Once the Shipment is scanned and validated, someone needs to remember that. Say, the user gets an urgent call, and needs to switch apps. When the user gets back, someone needs to know that the Shipment is already scanned and need not be scanned again. Again, this is the responsibility of the ViewModel.
Another way to describe the ViewModel is in its relation to the view. While the name ViewModel suggests it is connected to the view, a ViewModel is actually oblivious of the view that subscribes to it. Thus, presentation logic is not a responsibility of this layer. For example, the ViewModel will store the timestamp. The responsibility of transforming this timestamp to date (presentation logic) is not its responsibility. We call this layer ViewModel as it is lifecycle aware, and it holds the data that directly powers the view, but it houses the business logic and not the presentation logic.
4.3.2 Composition
The composition of the ViewModel is very vague. ViewModel is the heart of this design pattern, and such I believe this vagueness is the biggest gap that exists today in the definition.
And at the heart of this gap lies the question “Who does the ViewModel talk to?”
Let’s try to answer this question.
Let us consider the InboundActivity. This Activity has two Fragments, ScanShipmentFragment, and ScanSKUFragment. The Activity also has a PerformInboundButton.
Now, in this setup, let us evaluate some options.
4.3.2. 1 Activity-Scoped ViewModel(s)
In this approach, we can create one ViewModel for the activity, and it can take care of everything. It’s a pretty simple solution. All the Fragments as well as the Activity communicate with one ViewModel. In this way, the ViewModel can orchestrate everything.
In this approach, we can create one ViewModel for the activity, and it can take care of everything. It’s a pretty simple solution. All the Fragments as well as the Activity communicate with one ViewModel. In this way, the ViewModel can orchestrate everything.
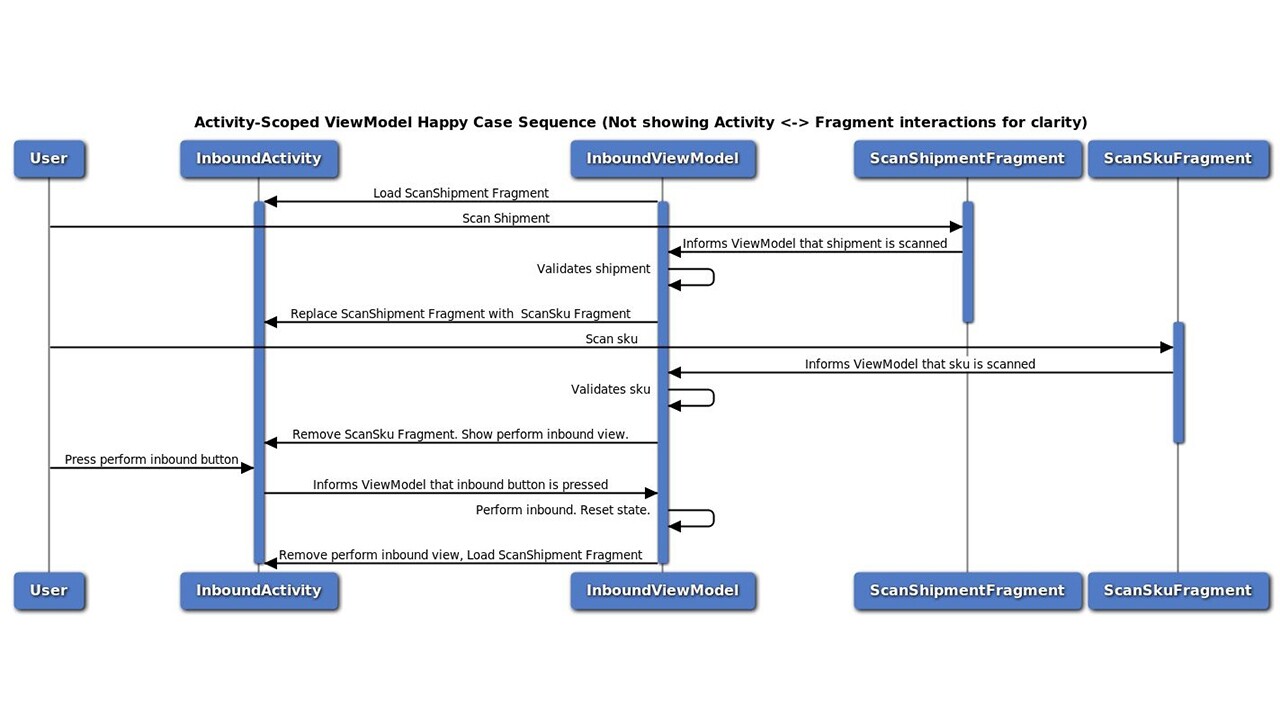
However, it breaks one important tenant we have established. “Fragments are not tied to Activities”. In this approach Fragments cease to be reusable components. Say, we have another Activity where SKU scanning is required. In this approach, we will have to create a new Fragment specifically for this Activity, adding redundancy and eliminating reusability.
Let’s try to do better.
4.3.2.2 Fragment-Scoped ViewModel(s)
Fragment Scoped ViewModels will definitely solve the reusability problem, but how will the Activity talk to the Fragments?
Fragment Scoped ViewModels will definitely solve the reusability problem, but how will the Activity talk to the Fragments?
For example, when ScanShipmentFragment scans the Shipment, it needs to inform the Activity so that it can orchestrate the next step of the business logic. To do this, wouldn’t the FragmentViewModel have to call the Activity, and if so, wouldn’t it again get tied to it?
Well, no. To understand this, let us understand how View ↔ ViewModel communication is meant to work.
- Fragment will directly call ViewModel Functions. Here ViewModel can expose a method saveScannedSkuID. Thus, Fragment will be aware of ViewModel and directly call its functions.
- ViewModel will publish events that the Fragment will listen to. In this example, saveScannedSkuID can return a Future Promise, that the Fragment will bind to.
Thus, the ViewModel does not need to be aware of the existence of the views. It will simply expose streams that the views or anyone else including other ViewModels can bind and listen to.
Now, this is better than our previous solution, but what about the business logic of the activity? If we don’t have an ActivityViewModel who will handle that?
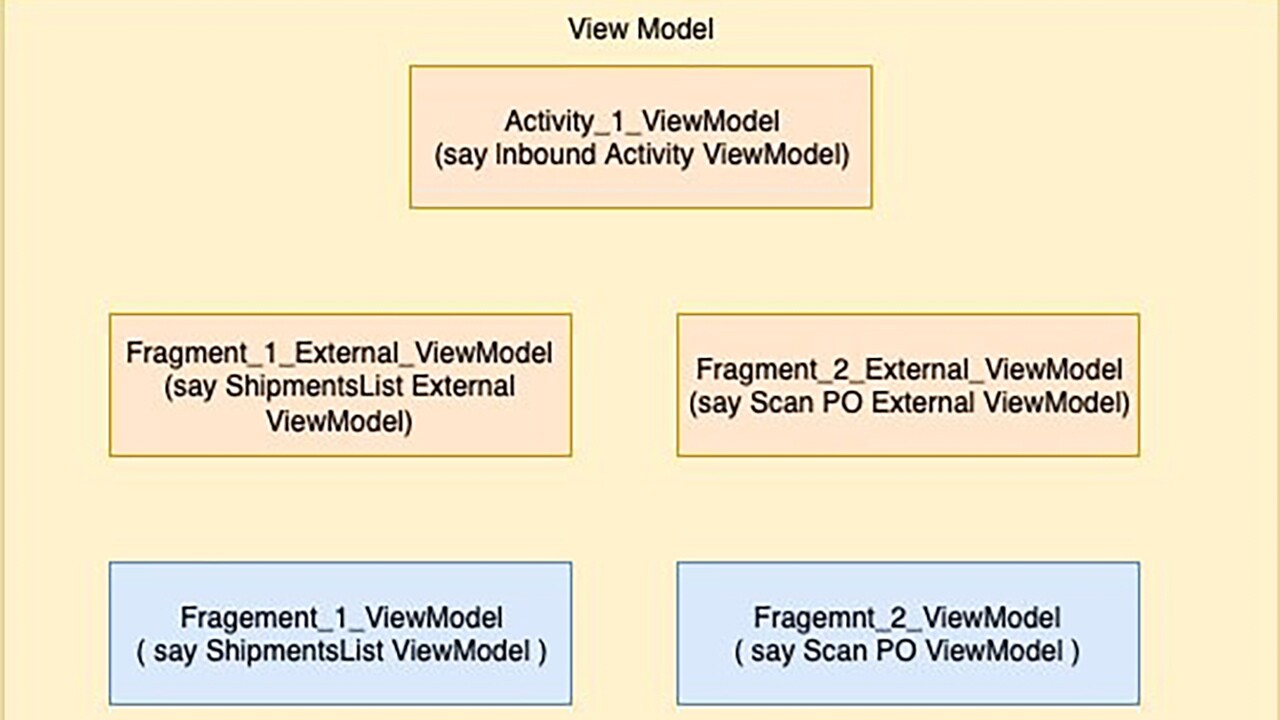
4.3.2.3 Activity & Fragment Scoped ViewModel
In this option, we have two kinds of ViewModels:
In this option, we have two kinds of ViewModels:
- FragmentViewModel - This ViewModel will be the stateful business logic layer for the Fragments. It will be called by the Fragment, and publish events that the Fragment will listen to. It will also be called by the ActivityViewModel, and publish events that the ActivityViewModel will listen to.
- ActivityViewModel - This ViewModel will be the stateful business logic layer for the Activity. It will be called by the Activity, and publish events that the Activity will listen to. It will also call the FragmentViewModels, and listen to the events they publish.
In this way, Activity can maintain its state, and perform its own business logic, as well as communicate to the Fragments. Furthermore, the Fragments need not be aware of each other. Let’s say that for the sake of argument, ScanSkuFragment needs Shipment ID. In this case, ScanShipmentFragment will publish the Shipment ID. Inbound ViewModel will listen to it and store it. Then when ScanSkuFragment needs it, the ActivityViewModel will pass it. Thus, we discover another role of the ActivityViewModel.
The ActivityViewModel allows Fragments to communicate with each other, without being aware of the existence of the other.
However, we now have a Single-Responsibility-Principle challenge, the FragmentViewModel will now have to serve both Internal (Fragment Side), as well as External (Activity Side) Communication.
And so, a question arises? Which ViewModel functionality is for the Fragment, which is for the Activity?
As the app grows, this will start to become very difficult to tell without deep-diving into the code. Moreover, ViewModel functionality meant for the fragment will be visible to the Activity and vice-versa.
These are not problems as such, and one can learn to live with them. By enforcing good LLD and coding standards, it is possible to mitigate and even overcome them.
But can’t we do better than this? What if we can take a design decision now that can greatly mitigate this and make it much easier to deal with?
Let’s go for it.
4.3.2.4 Activity & Interfaced Fragment Scoped ViewModel
In this approach, we will create two ViewModel Interfaces.
In this approach, we will create two ViewModel Interfaces.
- InternalFragmentViewModel - This interface will expose only the functionality meant for communication with the Fragment.
- ExternalFragmentViewModel - This interface will expose only the functionality meant for communication with the Activity.
The communication model is as follows.
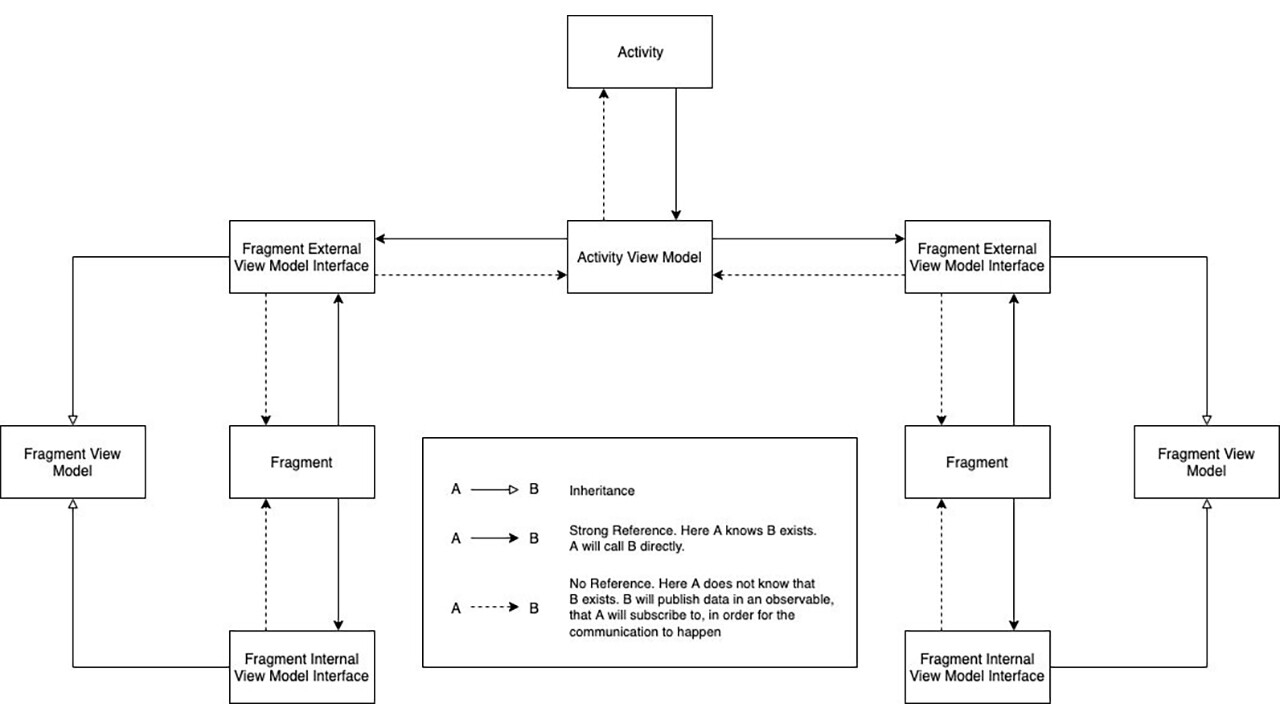
Thus, now we have clear contracts, and can enforce accessibility.
A good question to ask here is: why do we need the interface? Why not directly create two ViewModels? Wouldn’t that along with the advantages mentioned here, split the responsibilities and also prevent a God Class [12]?
Well not really. Here is why:
4.3.2.4.1 Implementation details are difficult to separate
While we were able to draw clear boundaries around ViewModel responsibility, the same cannot be said for implementation details. For example, after scanning a Shipment, the Activity might tell the Fragment to freeze and not accept any other Shipment. So, the Activity will call the ExternalViewModel. However, the business logic of scanning is under the purview of the InternalViewModel, so the ExternalViewModel will have to communicate the same to the InternalViewModel, where the actual business logic will take place. Thus, despite this being an external responsibility, in implementation, the ExternalViewModel will merely be a pass-through. We will only be adding an extra layer of code and not be able to reduce the size of the InternalViewModel. This makes two concrete implementations a bad idea.
While we were able to draw clear boundaries around ViewModel responsibility, the same cannot be said for implementation details. For example, after scanning a Shipment, the Activity might tell the Fragment to freeze and not accept any other Shipment. So, the Activity will call the ExternalViewModel. However, the business logic of scanning is under the purview of the InternalViewModel, so the ExternalViewModel will have to communicate the same to the InternalViewModel, where the actual business logic will take place. Thus, despite this being an external responsibility, in implementation, the ExternalViewModel will merely be a pass-through. We will only be adding an extra layer of code and not be able to reduce the size of the InternalViewModel. This makes two concrete implementations a bad idea.
However, this sounds like an excuse. Just because it’s difficult does not mean we shouldn’t try right?
So let me give a theoretical basis for this.
4.3.2.4.2 ViewModels are Stateful
Instead of seeing this as something that is difficult to separate, let’s look at it in terms of state ownership. In this case who should own the isActive state? Internal or External? The ideal answer is both. If ViewModels are to be stateful business layers, as we have defined thus far, each cannot delegate its state information to others. Yes, there will be some states that might only be useful to the activity and some only useful to the Fragment, but in most cases, the rightful owner will be both. Thus, the separation challenge is but a natural consequence of the definition.
Instead of seeing this as something that is difficult to separate, let’s look at it in terms of state ownership. In this case who should own the isActive state? Internal or External? The ideal answer is both. If ViewModels are to be stateful business layers, as we have defined thus far, each cannot delegate its state information to others. Yes, there will be some states that might only be useful to the activity and some only useful to the Fragment, but in most cases, the rightful owner will be both. Thus, the separation challenge is but a natural consequence of the definition.
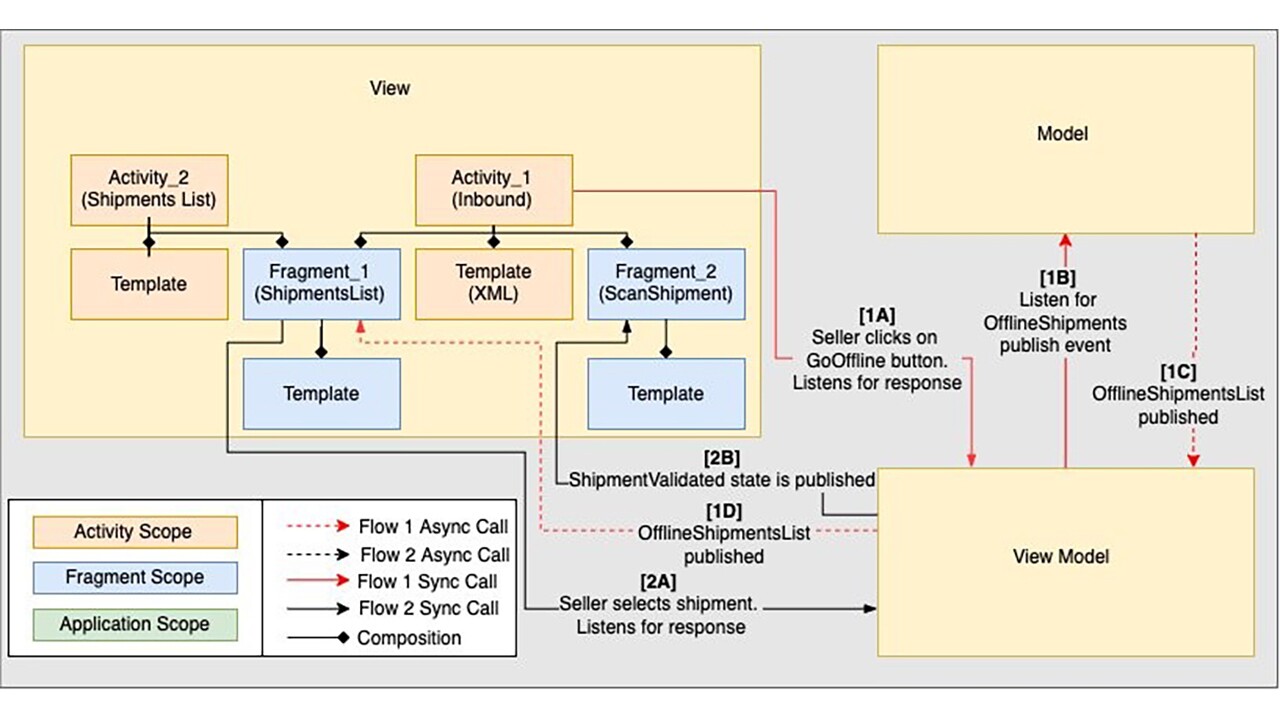
4.4 MVVM(I) in Action
Harking back to our use-case and with our now more detailed understanding of Android, let us define the InboundActivity UI. It will be composed of:
- ScanShipmentFragment, which allows seller to scan a shipment
- ShipmentsListFragment (which is a list of shipments), that seller can select from
Hence seller is expected to either scan a Shipment, or select one from the list.
When seller scans/selects a shipment:
- Shipment is validated
- The ScanShipmentFragment is frozen, basically, the camera is turned off and the Shipment field is greyed out and is un-editable
- Seller will now proceed to scan SKUs from the shipment for Inbounding
Finally let’s add offline support. In the InboundActivity, we will have a button, where seller can click to go offline. When the seller goes offline, what we do is fetch and validate from our local store instead of hitting the backend. For the purpose of this flow, let us assume that at some earlier timestamp, we have cached the Shipment data and kept it in our system.
Now using our definition, let’s design.
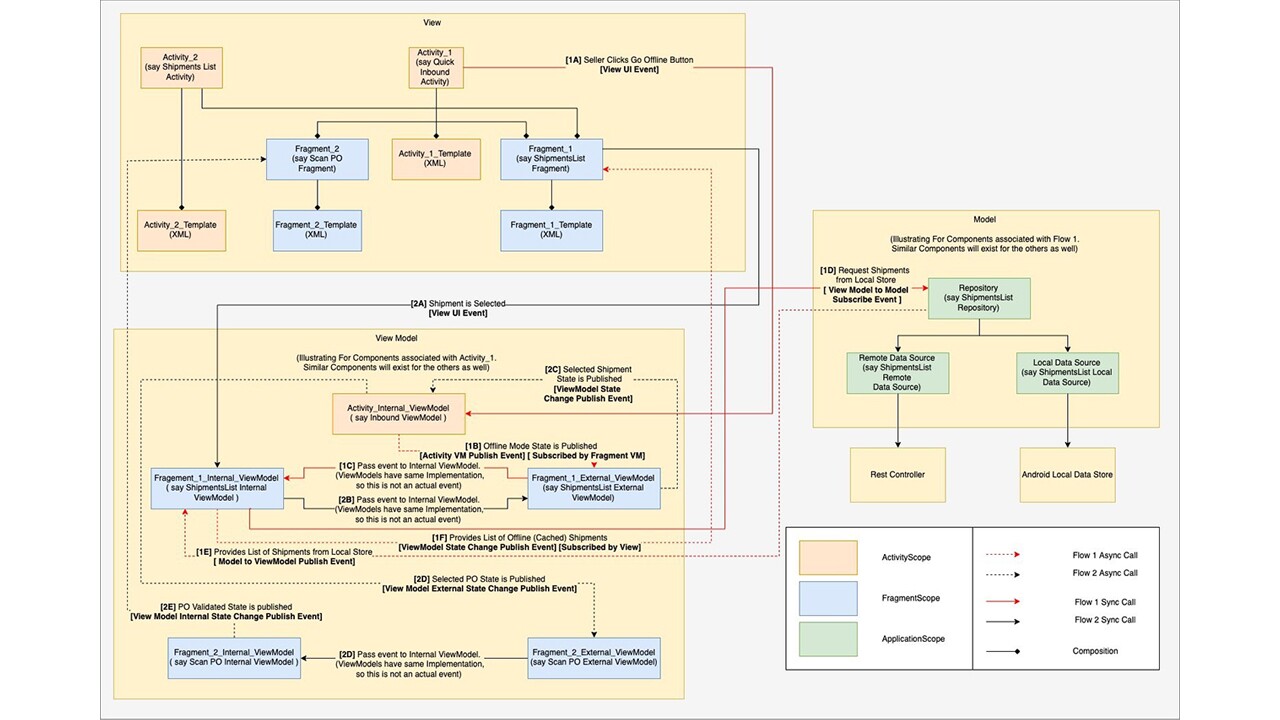
4.4.1 HLD
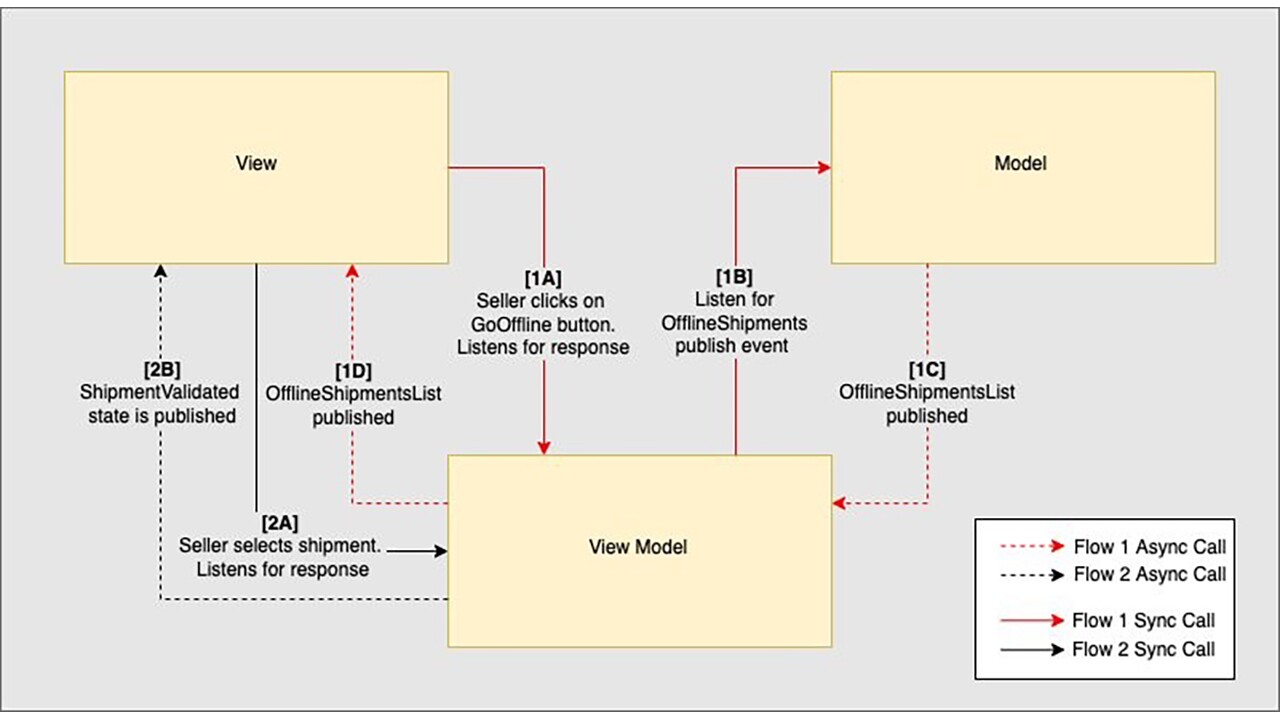
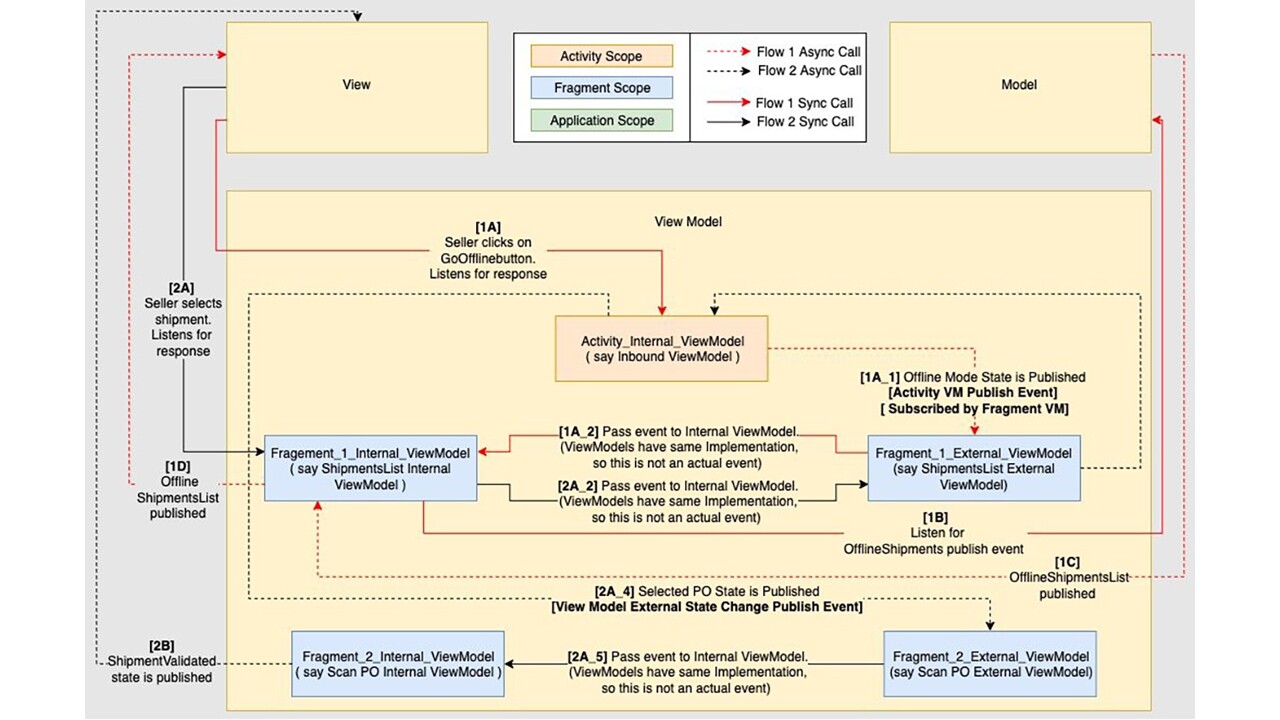
4.4.2 View-Model Deep-Dive
4.4.3 Model Deep-Dive
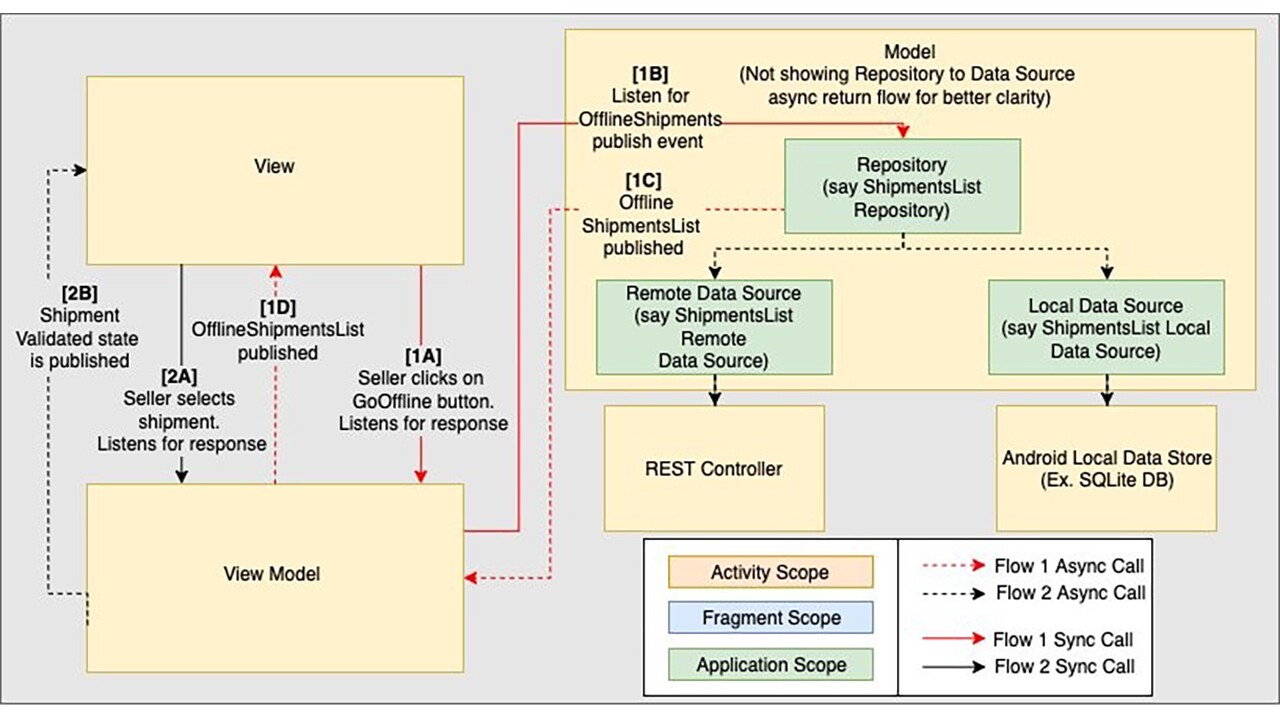
4.4.4 View Deep-Dive
Every component is strictly defined, behaviour is encapsulated, and design is open-closed extensible. Isn’t it beautiful?
For combined UML, see Appendix-1.
4.5 Interactor

Before we wrap up our definition, let’s talk about the ViewModel once more.
We had earlier mentioned that the ViewModel cannot be split into two due to statefulness. While that is true, the inability to split can obviously lead to a God Class. So what is the alternative?
Well, if statefulness is the cause, can’t we split it along state lines? i.e. can’t we have stateful code in the ViewModel and the non-stateful code in something else? That is exactly where the Interactor comes in. So, using this underlying concept let’s establish boundaries for dividing the responsibility in a more implementation backward way.
- ViewModel - Here the ViewModel, handles the delegation logic, i.e., it is responsible for calling the methods for a particular flow, but does not house the actual implementations of the same. It therefore will orchestrate the flow and hold down the state.
- Interactor - The Heavy Lifter that will implement the actual business logic of the individual actions and interact with the various Repositories to fetch the data and manipulate them as required. This thus can be a stateless. It does not need to understand why it is being called, it needs to know when it is called, how to send back a response.
4.6 Tying it all together
With that, let’s tie everything together and see it all in action.
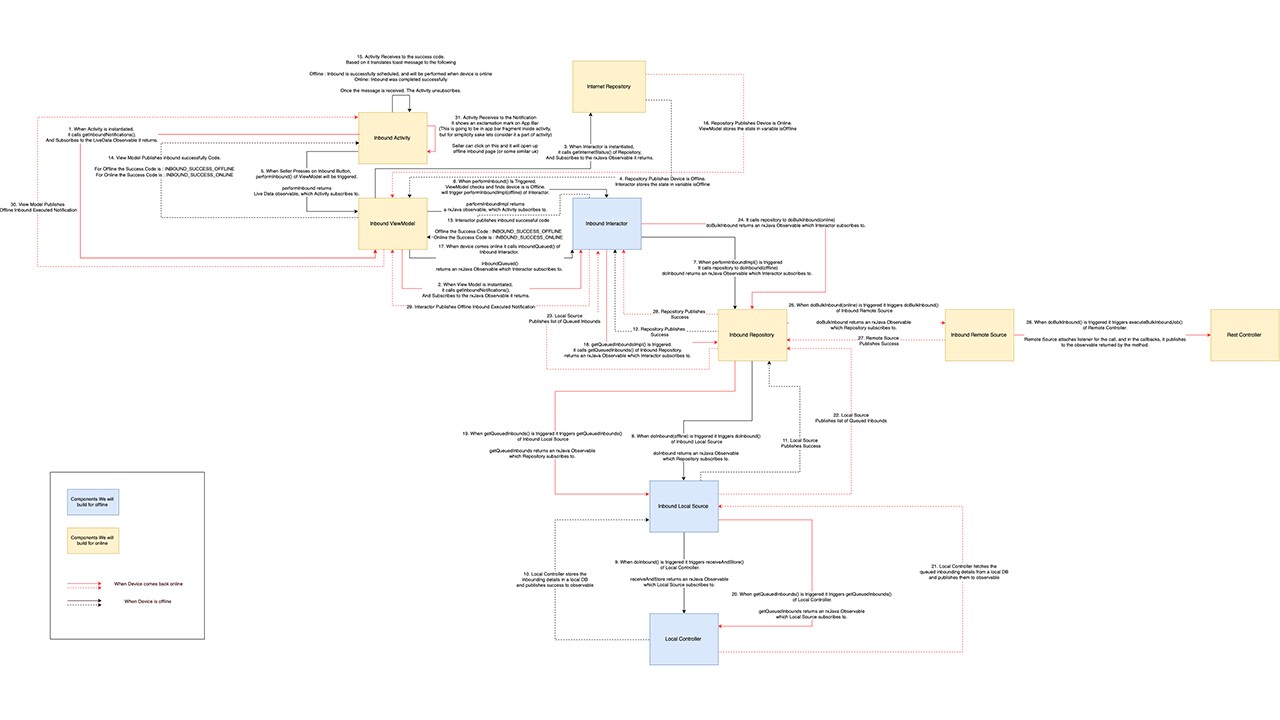
4.6.1Expanded Use-case
Let’s remove the simplifying assumptions. Now there will be no button the user can click to go offline. If there is no Internet, we should know that from the device itself. Moreover, inventory data is not static in nature, and so using cache data to perform an Inbound, will increase the possibility of an error manifold. So, this time lets’ go for a more realistic flow.
- When the internet connection is not there, we will auto-trigger offline mode
- Once in offline mode, if the seller Inbounds any item, what we will do is store the request payload, and have it queued
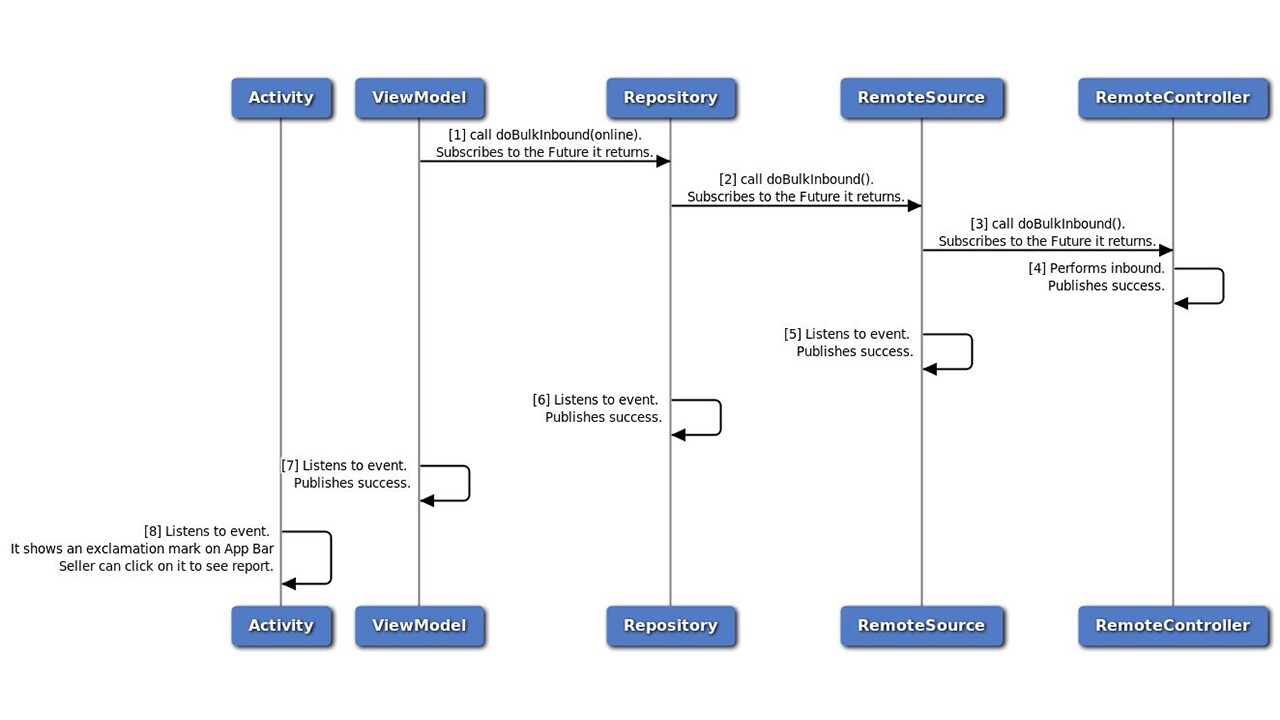
- When the seller comes back online, we Inbound all the queued items. And serve notification to the seller with all failed and successful Inbounds
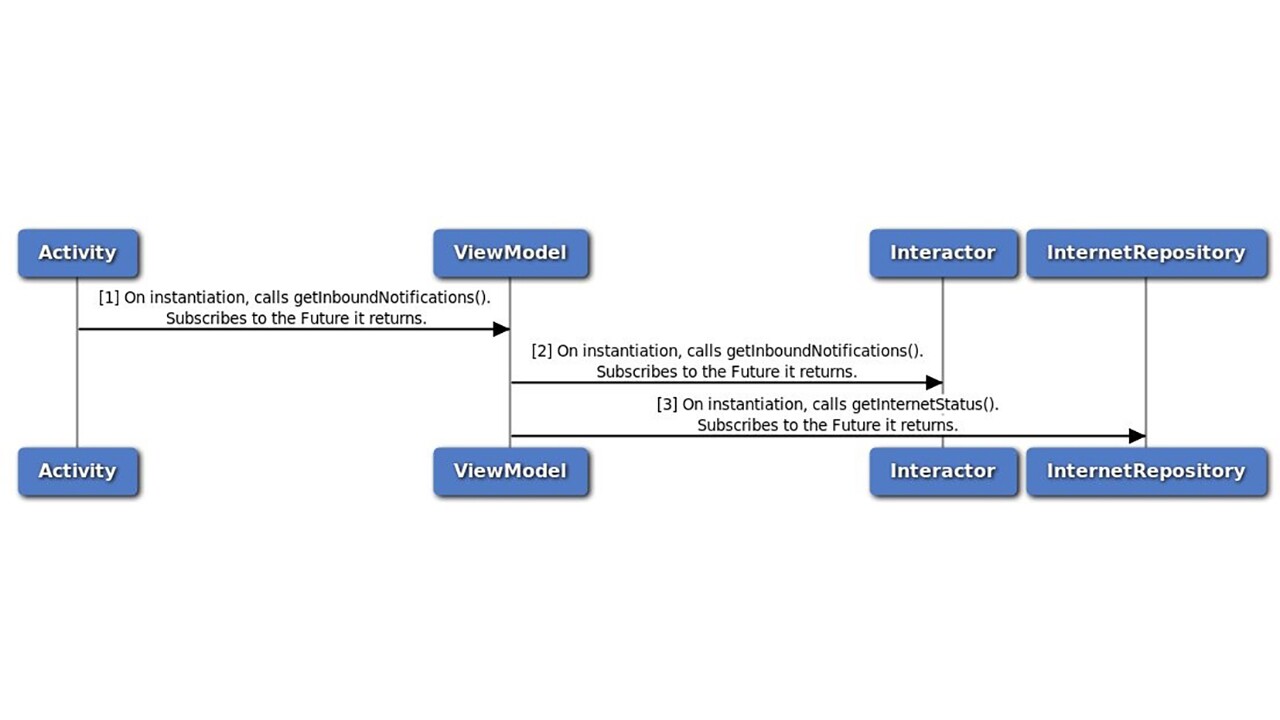
4.6.1.1 On Instantiation
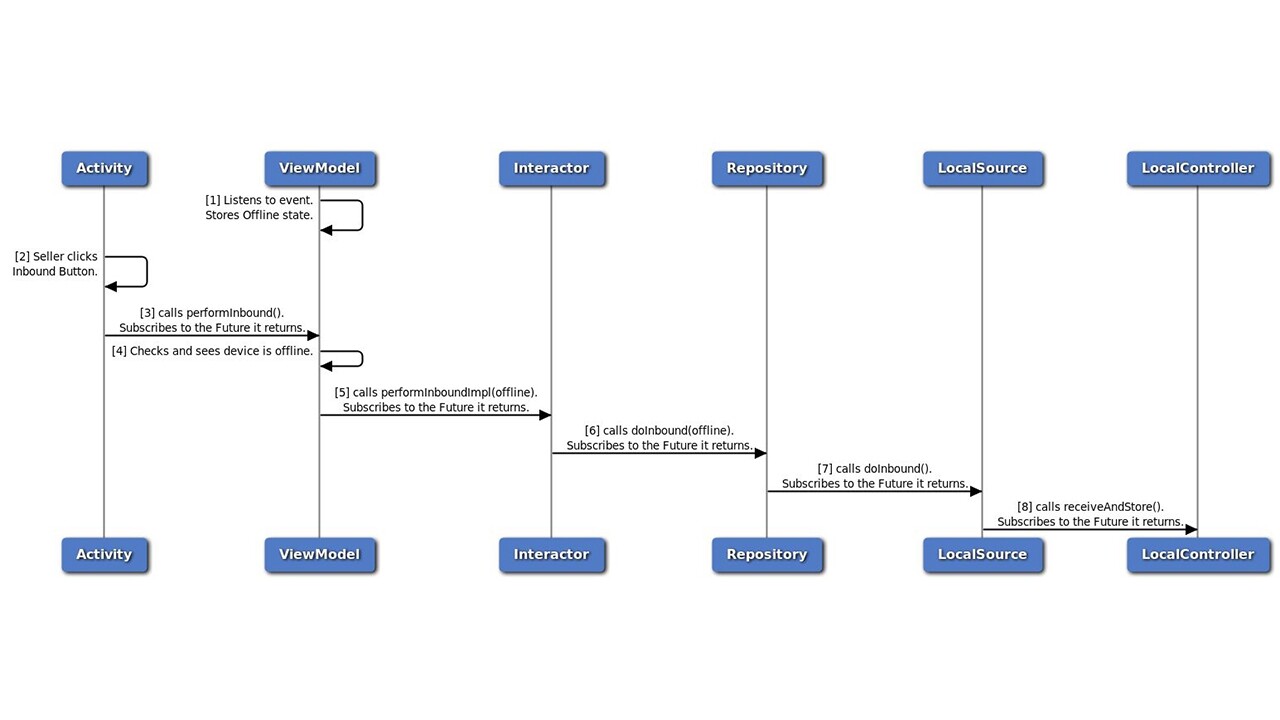
4.6.1.2 Device Goes Offline - The Forward Path
InternetRepository publishes device is offline.
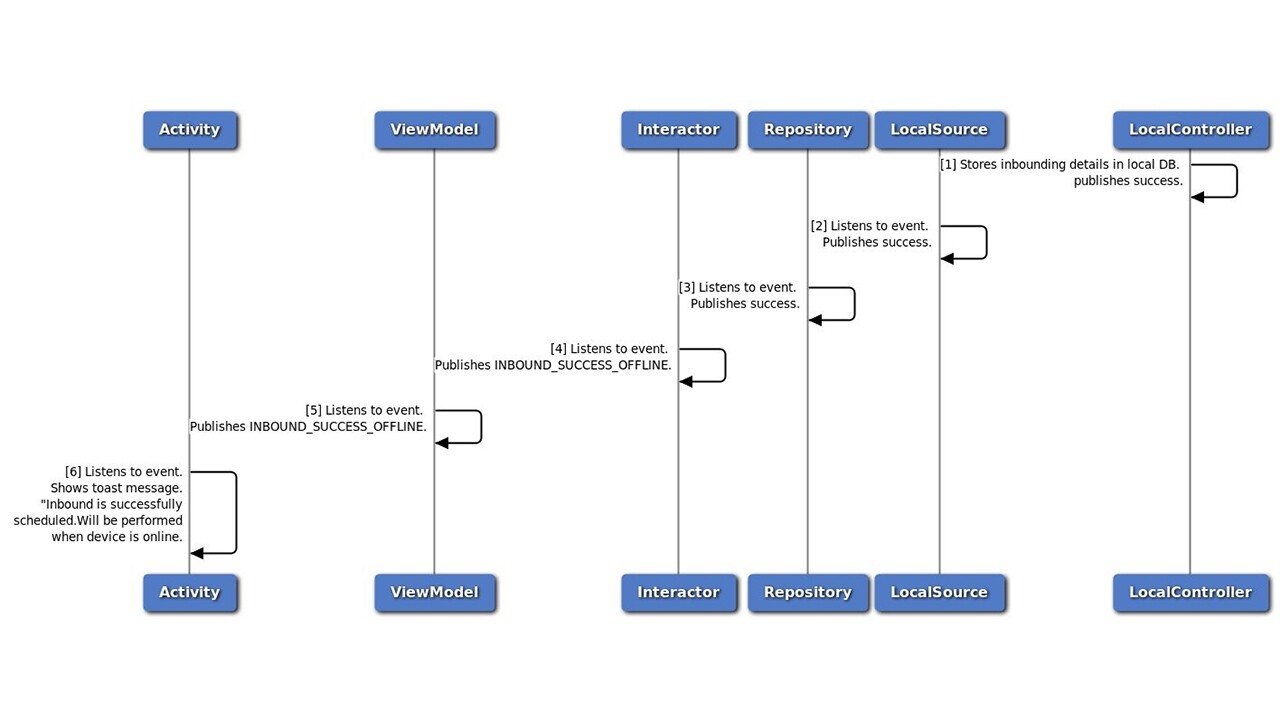
4.6.1.3 Device Goes Offline - The Return Path
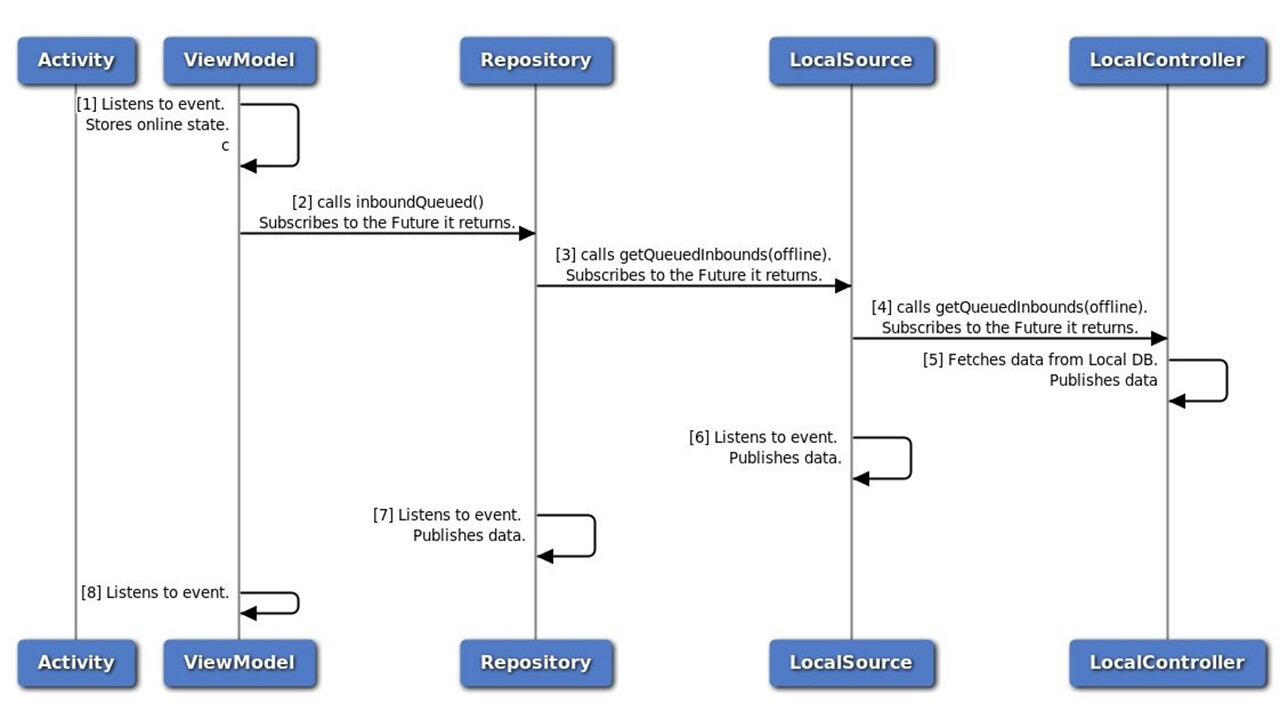
4.6.1.4 Device Comes Online - Fetch Queued Items
InternetRepository publishes device is online
4.6.1.5 Device Comes Online - Perform Inbound For queued Items
For combined UML, see Appendix-2 & Appendix-3
We have increased the complexity considerably, and yet our design was able to easily accommodate this. This goes to show that our defined MVVM(I) is not just text-book, but finds credence in the real world, and you should be able to plug-n-play this into your next Android challenge.
4.6.2 Finally, a Practical Guideline on When to use Interactor
Here, we have split along the lines of Online and Offline. The reason is - if you think in terms of our app, the heavy lifting is to be done by our BFF (Backend-For-Frontend) . Thus, without offline our business logic will be minimal and will mostly have to do with calling the right APIs in the right way.
Only once we lose access to backend in offline mode will we have heavy business logic in our app. And so, it is at the time of offline that adding the complexity of the Interactor layer will pay off.
Now in your app, business logic heaviness might be based on other factors. In our app, in the future we might discover new dimensions of complexity. The Interactor can be repurposed to cater to these as well.
But what I want to highlight is the mental model - how to see the Interactor and decide when to and when not to introduce it in your design.
5.1 MVP
There are plenty of resources that delve into MVP and compare it with MVVM(I) (linked below). So, I won’t go into it here.
But, in my deep-dive, I have come across a few points that are generally not mentioned or that only make sense once we have defined MVVM(I). Let’s look at those.
01 / 03
Now, what we should bear in mind, is that modularity, abstraction, and reactive paradigm comes at a cost, and that cost is more code and complexity. If properly done the complexity will be well dispersed and hidden away, and as such won’t be an issue, but will involve more development effort investment. The benefits will only start to become clear once the codebase is a certain size and caters to multiple use-cases.
If the business use-case of the app is not too complex, MVP will be a better choice given the low initial investment. If the focus is on a complex app that is planned to scale and will be worked on for years, then MVVM(I) is the winner.
5.2 VIPER
VIPER stands for View Interactor Presenter Entity Router[16]. So why are we not recommending Viper? Well, we kind of are!
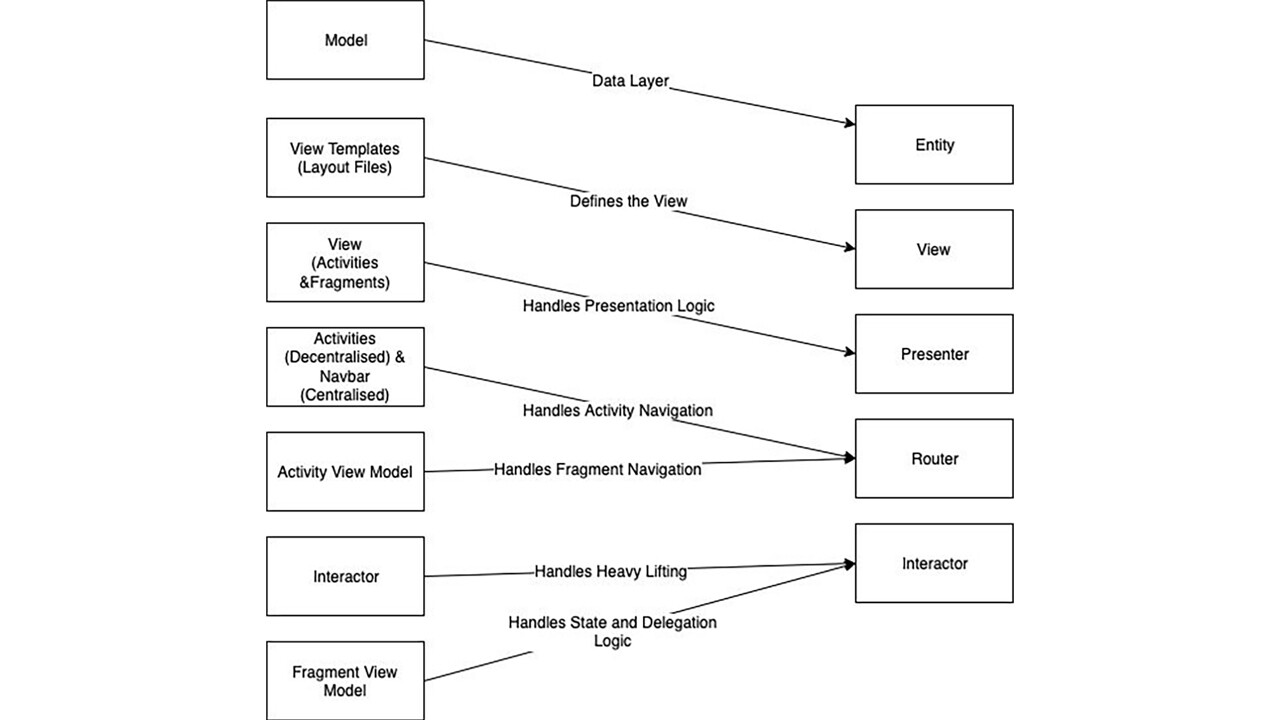
In essence we have all the components that make VIPER. So why not use VIPER directly?
We have chosen not to use it directly as, in Android, we have some special considerations that make our definition of MVVM(I) more suitable:
- As we can see from the above diagrams, we have more separation of concern than standard VIPER
- Android Fragments and Activities have different ways of navigation, and the fact that they can’t be instantiated by us, but only by the OS via intents, makes routers difficult to place
- Android Provides a ViewModel Component out of the box. Thus, the ViewModel is Android Context Aware, and allows for easy Lifecycle Management, making it more attractive in the Android domain
Thus, the absence of a discernible router, coupled with the Android Arch components and the requirement of multi-module apps makes our interpretation of MVVM(I) more attractive than VIPER.
So, to answer the question of why are we not using VIPER? Well, We Are! We are just using it in a different way that plays better with Android.
With that, it’s a wrap. I hope I have been able to explain a complicated topic in a simple way without resorting to oversimplification. I hope you liked reading this as much as I liked writing it. And I hope you will take away something of value from this. Thank for your time :)
- Design Pattern - Factory Pattern, Tutorials Point
- The Model View Controller Pattern – MVC Architecture and Frameworks Explained, FreeCodeCamp
- Clean Code by Mr. Robert C. Martin
- What Is Good code? - A 10-minute actionable introduction, Towards Data Science (Disclosure: Authored by Pratick Roy itself)
- MVP Vs MVVM: Differences in Android Architecture in 2021, Mobile App Daily
- MVC vs MVP vs MVVM for Android Application Development, Simform
- Our Way to MVVMI and Mistakes We Made When Implementing MVVM, Pro Android Dev
- Fragment, Google Android Developer Docs
- Activity, Google Android Developer Docs
- Pattern: Backends For Frontends, SamNewman&Associates
- Dagger Scopes, Subcomponents, Memory, and… Who Cares, VMWare 360.
- Layout Resources, Google Android Developer Docs
- Avoid God Class in OO Programming, CloudNative Master
- ViewModel, Google Android Developer Docs
- LiveData, Google Android Developer Docs
- Callback Hell in Android, Tech Your Chance
- Using the VIPER architecture on Android, Cheese Cake Labs
8.1 Complete MVVM LLD
For high res image please click here
8. 2 Complete MVVMi Sequence Diagram
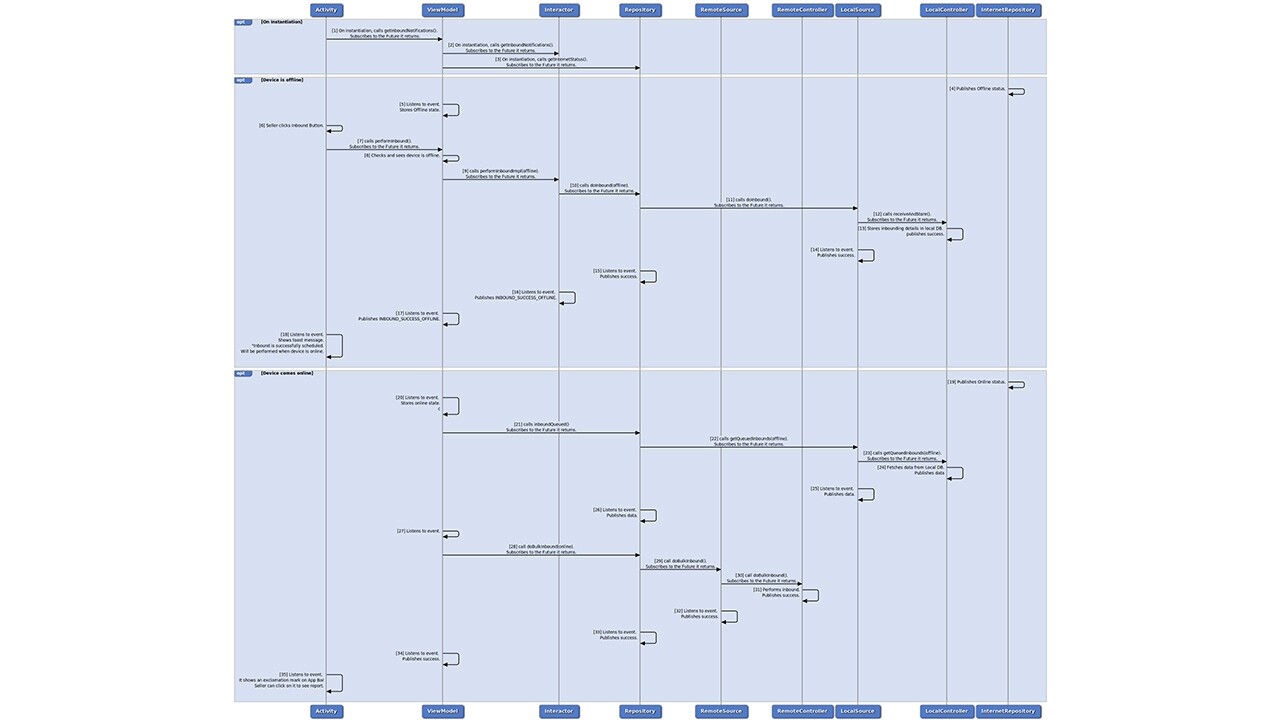
For high res image, please click here
8.3 Complete MVVM Component Diagram
The following diagram is very information-dense. It captures the essence of this blog’s learnings from a low-level perspective. As such you can use this diagram in three ways:
- If you can understand this diagram in its totality, then you have understood the blog well. So treat this is a test. If something does not make sense, a re-read may help.
- If you need a refresher in the future or need to lookup a specific aspect of the design quickly, this can be your cheat sheet.
- In the diagram, there is one subtle mistake. See if you can spot it. :)